

Intermediate level from ~henryxp~
1. Open up a new document in Photoshop. Set the canvas size to roughly 600×600 pixels.
2. The first thing you must do when creating a maze is to turn on the Grid. This will provide you with a guide in which to draw the lines that make up your maze. To do this, goto View > Show > Grid from the main menu.
3. Now create a new layer and title it as “Maze”.
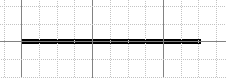
4. Next, select the “Line” tool from the toolbar. (See illustration below):

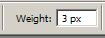
5. Then set the “Weigth” (located at the top of the menu bar) to represent the thickness of the line that you will be using in your maze illustration. For the purposes of this tutorial, I opted for a weight of “3 px” (3 pixels
6. It’s optional if you want the “Anti-alias” checked or not. If you have it unchecked, it will create a pixelated maze.

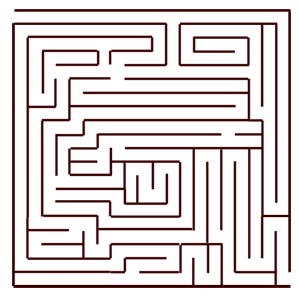
7. With the “Maze” layer selected, you can now begin drawing out your maze. Keep in mind that to make straight lines, you need to hold down the SHIFT key as you drag the lines for your maze. Use the grid as a reference when drawing the lines of your maze.
8. Just continue to draw the lines as in Step 7 to create your own unique maze.

9. Finally, turn off the grid by going to View > Show > Grid and then you have your custom maze
1. Open up a new document in Photoshop. Set the canvas size to roughly 600×600 pixels.
2. The first thing you must do when creating a maze is to turn on the Grid. This will provide you with a guide in which to draw the lines that make up your maze. To do this, goto View > Show > Grid from the main menu.
3. Now create a new layer and title it as “Maze”.
4. Next, select the “Line” tool from the toolbar. (See illustration below):
5. Then set the “Weigth” (located at the top of the menu bar) to represent the thickness of the line that you will be using in your maze illustration. For the purposes of this tutorial, I opted for a weight of “3 px” (3 pixels
6. It’s optional if you want the “Anti-alias” checked or not. If you have it unchecked, it will create a pixelated maze.
7. With the “Maze” layer selected, you can now begin drawing out your maze. Keep in mind that to make straight lines, you need to hold down the SHIFT key as you drag the lines for your maze. Use the grid as a reference when drawing the lines of your maze.
8. Just continue to draw the lines as in Step 7 to create your own unique maze.
9. Finally, turn off the grid by going to View > Show > Grid and then you have your custom maze